Lookup Tables

With lookup tables, you define a list of options for entries in custom fields.
▪To add a lookup table, click Add on the right above the Lookup Tables table.

▪Fill out the form.
The Name and the Field Type fields are required.
▪Click Update.

▪Add the first value: Click the left button above the Values and Columns table.
▪Depending on the field type, type a value or select a date from the calendar.
▪Press the Enter key or click outside the field to finish.
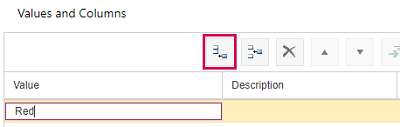
▪Optionally, enter a description of the value.
The Description field can be edited after a double-click in the cell.
▪Define further values, their order and outline levels by using the buttons.
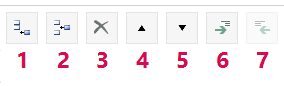
1) Adds a new row below the selected item.
2) Adds a new row above the selected item.
3) Deletes the selected item.
4) Moves the selected item up by one row.
5) Moves the selected item down by one row.
6) Indents the selected item.
7) Outdents the selected item.
▪Click Save at the bottom left.
When the lookup table is complete, link it to a custom field.
➤ Once a lookup table is linked to a custom field, the lookup table cannot be deleted.
▪If you want to delete a lookup table, select it and click Delete on the right above the Lookup Tables table.